User Interface Guidelines (Forms)
In order to provide a uniform user experience throughout the application, the dev. team has agreed to adopt a standardized user interface in all the views.
The proposed user interface is shown below and contains
- Bread Crumb
- Custom Toolbar Icons
- Standard Toolbar Icons
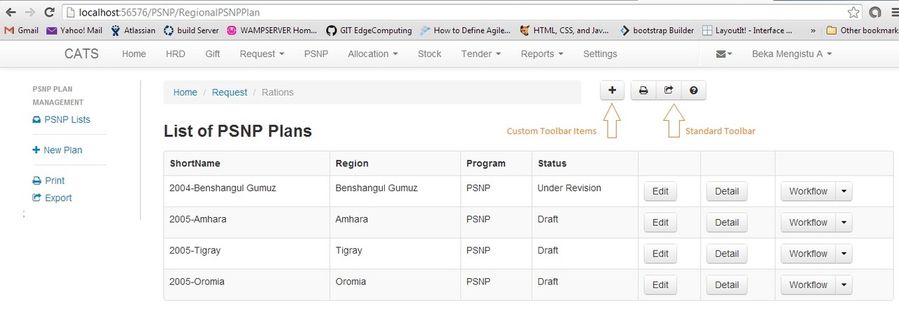
The Bread Crumb section and the standard toolbar are defined at layout levels and individual pages need not worry about them.
The Custom Toolbar is where we add every button or link our views need. For uniformity every link or button we use in our view should be declared in the Toolbar section of the layout.
@{
Layout = "~/Views/Shared/_MainLayout.cshtml";
}
@section LeftBar
{
    @Html.Partial("_PSNPLeftBar");
}
@section Toolbar
{
    <a data-buttontype="btn_new_record"  class="btn toolbar-btn " href="@Url.Action("Create", "RegionalPSNPPlan")"></a>
}
The line <a data-buttontype="btn_new_record" class="btn toolbar-btn " href="@Url.Action("Create", "RegionalPSNPPlan")"></a>
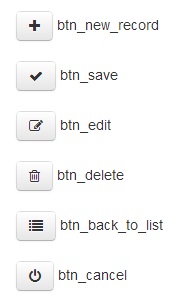
adds a button of type "btn_new_record" which is rendered as a plus sign. There are six standard buttons (see picture below) which cover most of the actions in data manipulation. You can also create custom button with a text.
Form Submission
Form submission is possible by giving our form an Id field and specifying that id in 'data-submittedform' attribute of our button.
@section Toolbar
{
    <a class="btn toolbar-btn " data-buttontype="btn_save" data-submittedform="frm_create_psnp"></a>
}
....
@using (Html.BeginForm("Create", "RegionalPSNPPlan", FormMethod.Post, new { id = "frm_create_psnp" }))
{
...
}